What do people mean when they say that images have been optimized for the web? The basic principle of optimization, as far as images are concerned, is to have the images look good while also loading quickly at the same time. You want your images to be small and able to load fast when someone enters your site, but still, you want them to be high-quality pictures that look sharp and detailed.

One of the most common mistakes people make is that they decrease the size of the image within their website creation program, not in an image editing program like Adobe Photoshop. You know this is the case when the page is mostly text with only a couple of pictures, but it still takes a long time to load. In order to have a successful website, it is vital for it to be able to load quickly, regardless of how much content is being displayed on it.
When you are resizing your image in a website creation program, you are not decreasing the file size of the image, just the scale of the image being displayed on the website. When you decrease the size of the image in the website creation program, what you are basically doing is that you are telling the browser to rescale the image while it is loading the page, which is additional and completely unnecessary work for the browser to be doing. So, even though it appears to be really small once the page has finally loaded, the actual file size of the image remains the same.
What you really need to do is to first resize the image in an image creation and editing program like Adobe Photoshop, where you will actually be changing the file size of the image before uploading it to your website. This is actually a quick and easy process and you don’t have to be a professional web designer or a Photoshop ace to do it.
There are dozens of different ways to resize images while keeping them clear and detailed, but let’s just look at the most simple and effective one for starters.
Using Adobe Photoshop’s “Save For Web“ feature
The two most common image formats that are used on the web are JPEG and GIF. Let’s see what each format is about.
JPEG
The JPEG is used most commonly when the image is a photograph, because it is able to represent images that use millions of colors and preserve the variations of continuous-tone images.
GIF
The GIF format works best when when compressing solid-color images and images with repetitive colors. This format is used most with logos, illustrations, line art and fonts, things of that nature.
Optimizing Images in 4 Easy Steps
Novices who are not that familiar with Adobe Photoshop might not know about the “Save For Web“ option, which makes optimizing an image for the web a lot easier than when you are saving images in Photoshop with the regular “Save As“ command.
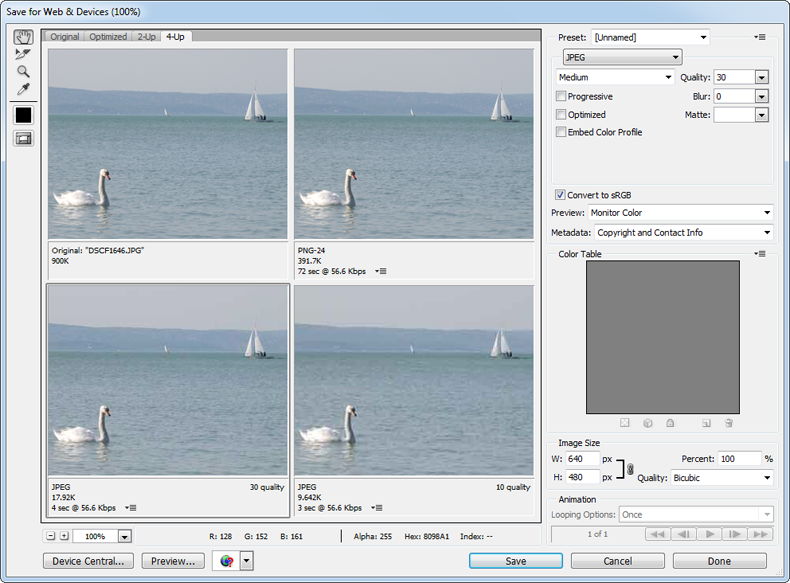
The “Save For Web and Devices“ command and accompanying dialogue box makes it very easy for you to compare the original image and the compressed alternatives you have to choose from when you are resizing your images. Here’s what you do.
1. Open your image in Adobe Photoshop and then choose File > Save For Web And Devices.
2. When the dialogue box appears, click on the 4-Up tab. On the Preset drop-down menu, choose the file format you want, whether it is JPEG or GIF. In the upper left preview, you can see the original image. Photoshop automatically renders three alternatives to your current image, there is a high, medium and low-quality alternative available for both JPEGs and GIFs. Under each of the preview windows, you will be able to see the file size, the quality of the image, and how long the image will take to load on a given modem speed.
3. This is the part where you fool around with the options a little. Try out all of the alternatives and see what they look like. See how the quality of the image corresponds to the file size of the image and then use your eye to make a decision and pick what you believe would be optimal for your website. The goal is to have the best possible image quality in the smallest possible file size.
4. When you have made your decision and you are happy with both the size of the file and the quality of the image, click Save and give the file a name. It’s as simple as that.


